> For the complete documentation index, see [llms.txt](https://docs.immedio.io/llms.txt). Markdown versions of documentation pages are available by appending `.md` to page URLs; this page is available as [Markdown](https://docs.immedio.io/immedio-forms/guides/integrations/hubspot.md).
# HubSpotへデータを転送する
immedio FormsからHubSpotへのデータ転送については、大きく4つの方法があります。
* CSVを使った都度インポート
* トラッキングコードによる連携
* Form APIを使った転送
* Contact APIを使った転送
* Zapierを使ったリアルタイム連携
### トラッキングコードによる連携
immedio Forms内にHubSpotのトラッキングコードを挿入します。チェックを入れるだけでOnになりますが、正しくHubSpotにデータが取り込まれるためにはimmedio Forms上の識別子と、対応するHubSpotプロパティの内部名が合致している必要があります。詳しくは[こちらのヘルプ](https://knowledge.hubspot.com/ja/forms/use-non-hubspot-forms#hubspot%E4%BB%A5%E5%A4%96%E3%81%AE%E3%83%95%E3%82%A9%E3%83%BC%E3%83%A0%E9%80%81%E4%BF%A1%E3%82%92%E3%82%AD%E3%83%A3%E3%83%97%E3%83%81%E3%83%A3%E3%83%BC%E3%81%99%E3%82%8B%E3%81%9F%E3%82%81%E3%81%AE%E8%A6%81%E4%BB%B6)をご参照下さい。
### Form APIを使った転送
トラッキングコードを使った転送についてはHubSpotの内部処理の関係でタイムラグが生じる場合があります。リアルタイムでの連携を行う場合はForm API連携を活用して下さい。この場合、HubSpot内に対応するFormを作成し、そのPortal IDとForm IDを指定する必要があります。
### Contact APIを使った転送
1. [HubSpot連携設定](/immedio-forms/settings/hubspot.md)で「HubSpotに連携する」をクリックして HubSpot 側の認証を行います。
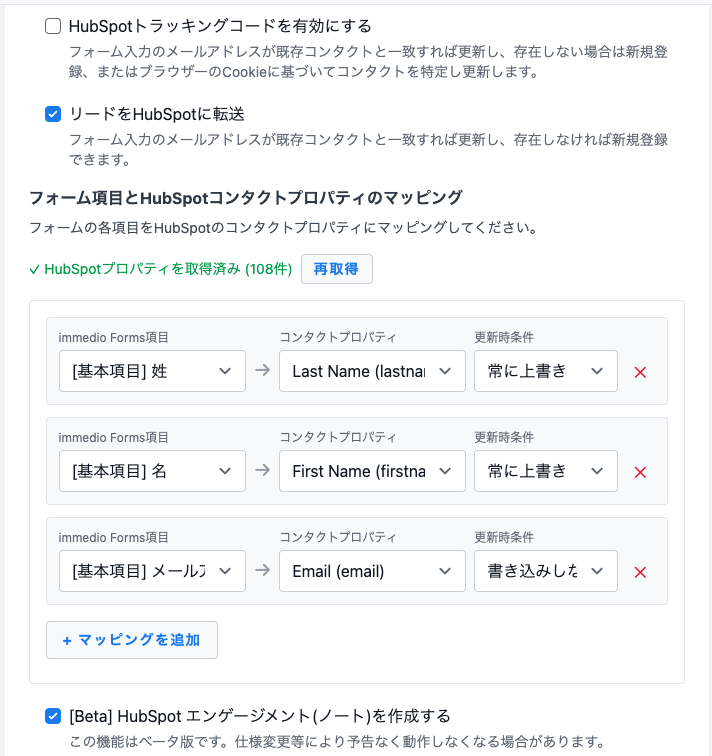
2. その後、作成したフォームの編集画面下部の「HubSpot連携」で「リードをHubSpotに転送する」にチェックを入れます。
3. するとimmedio FormsとHubSpotの項目マッピング画面が表示されます。最初にマッピングする際は「HubSpotプロパティを取得」をクリックして下さい。
4. そのうえでimmedio Formsの各項目に対し、HubSpot側の連携したいプロパティを選択します。値なしの場合のみ書き込む(値ありの場合は書き込まない)場合は「値なしの場合」、既存の値があっても上書きする場合は「常に上書き」を選択して下さい。
5. マッピング完了後に保存頂くと、次からimmedio Forms送信時にHubSpotにデータが自動連携されます。
6. また、項目へのアップデートではなくエンゲージメントを作成したい時は、「エンゲージメントを作成する」にチェックを入れて下さい。
### Zapier連携
1. ZapierではデータをZapier側に連携するTriggerと、Zapierからデータを出力するActionの設定が必要になります。今回は名刺データを出力するimmedio FormsがTriggerで、データを受け取るHubSpotがActionになります。
2. Zapier上で新しいZapを作成する際は、Zapierの管理画面で「+Create」をクリックして下さい。
3. immedio FormsのTrigger設定については[こちらの記事](/immedio-forms/guides/integrations/zapier.md)をご参照下さい。
4. 次にActionを設定します。Zapierの連携先から、HubSpotを選択して下さい。
5. 次にどのActionを利用するかを選択します。主に使用するのは以下のいずれかで、これらを組合せて設定することも可能です。
1. Create Contact:コンタクトを作成(上書きはしない)
2. Create or Update Contact:コンタクトを作成。同一のメールアドレスで既存のコンタクトがあれば、その各項目を上書き
3. Create Engagement:コンタクトに紐づけた活動を作成。immedio Formsでとったアンケート結果を保存したいが、コンタクトには該当する項目がない、またはコンタクトの項目を上書きしたくないという際にご利用下さい
6. 次の画面で認証を行います。「Connect a new account」を選択して下さい。ここでご利用中のHubSpotのテナントを選択し、次の画面で連携の許可を与えます。
7. 認証が完了したら、連携設定を行います。右側にHubSpotのリード項目一覧が表示されますので、その中でimmedio Formsの情報を連携したい項目をクリックし、immedio Formsから連携された項目を選択します。
8. マッピングが完了したら最後にZapier上でテストを行います。テスト結果が問題なければ「Publish」をクリックして下さい。

---
# Agent Instructions
This documentation is published with GitBook. GitBook is the documentation platform designed so that both humans and AI agents can read, navigate, and reason over technical content effectively. Learn more at gitbook.com.
## Querying This Documentation
If you need additional information that is not directly available in this page, you can query the documentation dynamically by asking a question.
Perform an HTTP GET request on the current page URL with the `ask` query parameter, and the optional `goal` query parameter:
```
GET https://docs.immedio.io/immedio-forms/guides/integrations/hubspot.md?ask=&goal=
```
`ask` is the immediate question: it should be specific, self-contained, and written in natural language.
`goal` is optional and describes the broader end goal you are ultimately trying to accomplish on behalf of the user. GitBook uses it to tailor the answer towards what is most useful for that goal.
The response will contain a direct answer to the question and relevant excerpts and sources from the documentation.
Use this mechanism when the answer is not explicitly present in the current page, you need clarification or additional context, or you want to retrieve related documentation sections.